
Screenshots are an essential feature for many laptop users. They allow users to capture images of their computer screens, which can be helpful for a range of purposes. Whether you’re a student, a professional, or a casual user, knowing how to take screenshots on your laptop can be a valuable skill. In this article, we’ll provide a step-by-step guide on how to take screenshots on a laptop, along with some tips and tricks.
Step 1: Choose the Right Method
There are several ways to take screenshots on a laptop, and the method you choose will depend on your specific laptop and operating system. Some common methods include using keyboard shortcuts, using built-in software, or downloading third-party tools. For Windows laptops, the most common method is using the Snipping Tool or the Print Screen button, while Mac laptops use the Command + Shift + 3 or 4 keys.
Step 2: Use Keyboard Shortcuts
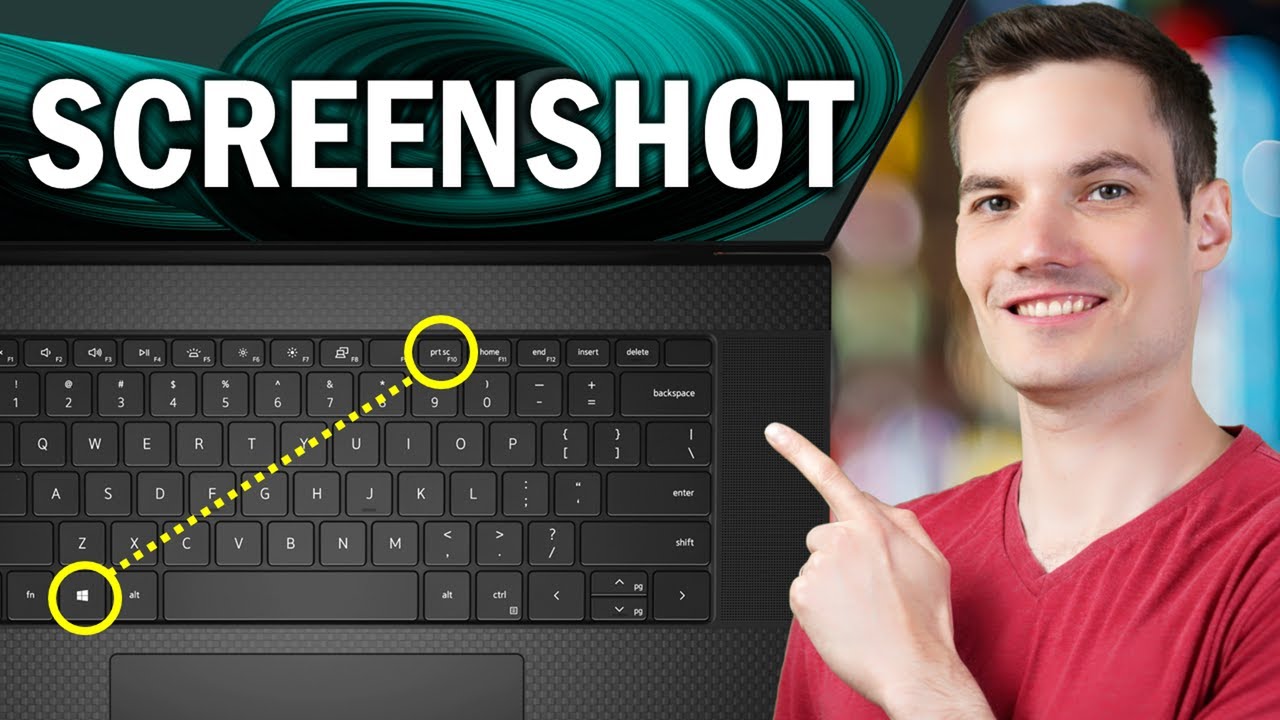
One of the quickest and easiest ways to take a screenshot on a laptop is to use keyboard shortcuts. For Windows laptops, pressing the Print Screen (PrtScn) button will take a screenshot of the entire screen. To take a screenshot of a specific window, press Alt + Print Screen. For Mac laptops, pressing Command + Shift + 3 will capture the entire screen, while pressing Command + Shift + 4 will allow you to select a specific area of the screen to capture.
Step 3: Use Built-in Software
Many laptops come with built-in screenshot software that can be accessed through the Start menu or the search bar. For Windows laptops, the Snipping Tool is a popular built-in option that allows users to take screenshots of specific areas of the screen. For Mac laptops, the Preview app provides a similar feature that allows users to capture screenshots and make edits.
Step 4: Use Third-party Tools
If you’re looking for more advanced screenshot features, there are several third-party tools available for download. Some popular options include Lightshot, Greenshot, and Snagit, which provide additional features such as annotation, editing, and sharing options.
Experiment with different methods to find the one that works best for you.
Learn how to save and share your screenshots in different formats, such as PNG or JPEG.
Practice taking screenshots to improve your speed and accuracy.
Use editing tools to highlight and annotate important information in your screenshots.
Consider using a keyboard shortcut to open your preferred screenshot tool for quick and easy access.
Taking screenshots on a laptop is a simple but powerful tool that can be used for a variety of purposes. Whether you’re capturing images for work, school, or personal use, knowing how to take screenshots can help you be more productive and efficient. By following these guidelines and practicing your skills, you can become a screenshot pro in no time
weirdnewsera.com is a fast-growing news aggregator that brings you the latest news stories, and breaking international news that’s just a click away.
Our team are committed to keeping you up-to-date with stories wherever you are in the world, across a variety of different sectors and industries from politics to entertainment. Click Here.
24World Media does not take any responsibility of the information you see on this page. The content this page contains is from independent third-party content provider. If you have any concerns regarding the content, please free to write us here: contact@24worldmedia.com